My MGP! The four songs I play are: “Ours” by Taylor Swift, “Fallen” by Sarah Mclachlan, “Girl you’re taking home” -by Ella Langley, & “Danny’s song” by Loggins and Messina. I had so much fun working on this project!
Topic #13: Sketchnote Course Reflection
Free Inquiry Topic #11: Progress & Reflection
I can’t believe this is my last free inquiry post! To reflect on my progress, I’ve created a presentation on Prezi that condenses all the work I’ve done. It was my first time using Prezi, and I think it went well! In the presentation, I cover the Indigenous plants I’ve learned about, along with the resources that have been most helpful throughout my research. Here’s the link: [roOMj31QoDCC1l8IdWlJ]. *It may take a moment to load all of the content because I’ve included a number of photos throughout!

Weekly Reflection #11: Digital devices — Bicycles for the mind or distraction machines?
I think that at an elementary level, cell phones are distractions. My thoughts pretty well align with School District 61 Code of Conduct Update: Cell Phones & Personal Digital Devices. Elementary school is a crucial period for kids’ cognitive, social, and emotional development. Schools aim to provide an environment where students can focus on hands-on learning, physical activity, and direct engagement with peers, which I think would be hindered by phone use. Elementary students are still developing the emotional maturity required to handle the responsibilities that come with having a phone (privacy concerns, online safety, managing screen time etc.), and I think that adding the expectation of using it responsibly in class is too much at this stage of their development.
I don’t think that phones have a place in grade four and five classrooms (which is the grade that I’m learning towards teaching). Most of the kids I see on Wednesdays don’t have phones, and watching them try to use Chromebooks was a bit of a struggle. For that reason, I don’t think that my group would be able to use the Arduino Science Journal. I think it has some super cool activities, but I think that they are better suited to a middle & high school crowd. In older age groups, I think that students will be better equipped to make responsible decisions about their use of technology.
I recognize that I’ve taken a pretty hard stance on no phones in class, but I do understand how they can be useful for certain students and in certain situations. I absolutely believe that accommodations such as access to a computer or Chromebook should be made for students without personal digital devices who may need access to the internet to complete schoolwork. I also believe that if the use of personal digital devices can support students with disabilities, diverse abilities, or medical needs as outlined in the student’s support plan or IEP, that those devices should be supported and encouraged.
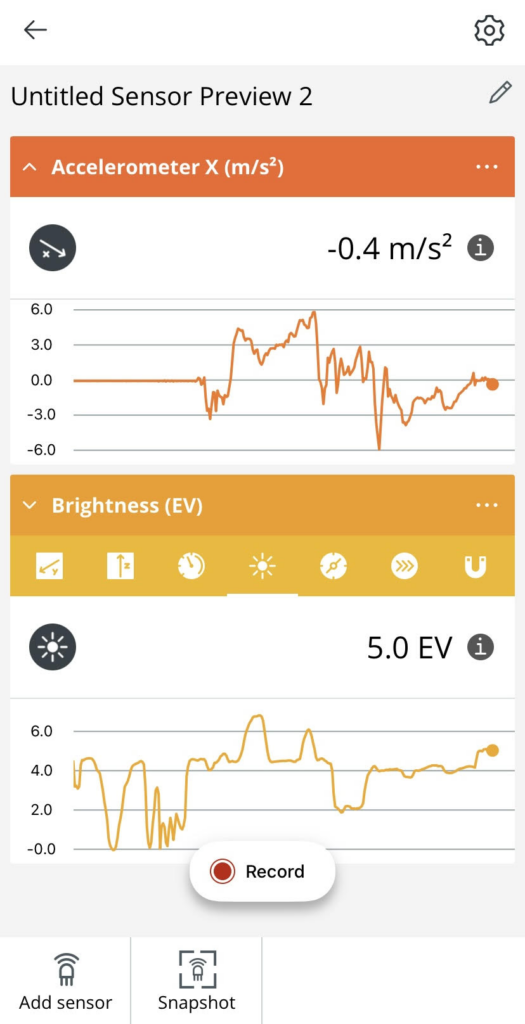
Here is a screenshot of my Arduino Science Journal activity. I was using the light detector to investigate the light in my environment! I found my highest reading when I tilted the phone towards the natural light in my room, and its lowest reading when I hovered my finger over the light sensor (I found it on the front face of my phone!). Super cool activity!
Weekly Reflection #10: Technology, Classroom management, & Inquiry

This week’s class was fantastic — Brittany is such an inspiring teacher! I really appreciate her SEL morning check-ins and her focus on soft starts and transitions. I spend Wednesdays in a grade 4/5 class, and they begin each day with about fifteen minutes of silent desk work, and finish their day by free time or outdoor play. I’m a strong believer in soft starts and I can absolutely see how they can help make time for absences and assessments. Brittany’s idea of having each student touch a “zone” as they enter the classroom is also brilliant — I might borrow it! It’s a simple yet effective way to help kids feel safe and supported.
I was also excited to learn about the digital portfolio tool she uses, which I’d never heard of before. It seems like a great way to track progress and communicate with families. I really like the idea of ongoing assessment rather than relying on traditional report cards at the end of a term. The way Brittany collaborates with her students to create rubrics, decorations, and learning materials also fosters a strong sense of community in the classroom. I definitely see the value in these approaches and hope to incorporate them into my own teaching someday.
This website has 10 student check-in activities that could be used as part of a morning soft start! Link: https://www.socialemotionalworkshop.com/student-check-in-activities/
Assignment #2: Educational Technology Presentation
In this video, my group explores the benefits and drawbacks of game-based learning in elementary education. We share our key findings and insights on how gaming could influence the future of teaching! I have attached the video here:
Weekly Reflection #8: Coding & Gaming in Education
I absolutely believe that gaming can be used as an educational tool! Using games, I think that we can “trick” students into fostering skills like computational thinking, problem-solving, critical thinking, and decision-making. By integrating digital games into the curriculum, we can create immersive and interactive learning environments for our students!
Whether it’s reinforcing vocabulary, practicing math concepts, or exploring historical events, I think that games can directly support the achievement of specific learning objectives of core subject areas. In addition to subject-specific learning, gaming can also support the development of digital literacy—a critical skill for success in today’s increasingly technological world. Digital literacy involves the ability to use technology to access, manage, evaluate, and to create information. It is a skill that, like all other core subjects, requires practice and development — which games can facilitate in an engaging way!
Right now I’m leaning towards teaching a 4/5 grade level, and I’m not sure if coding would work at that age group. I spend one day every week in a grade 4/5 class, and one thing I’ve noticed is that the students have incredibly varying levels of math and literacy skills. There are students in that class who are working on multiplication and division, while some are still learning how to convert numbers from expanded form to standard form. However, maybe I could pick an activity where students work at their own pace and can pick their own challenge levels. Game-based learning has so many benefits, including interactivity, immediate feedback, customization, and enhanced accessibility, to name just a few. I’m eager to find ways to integrate gaming into my classrooms, hopefully* across all age groups.

This is a screenshot of the coding project that I worked on for this class! It was called Music Lab: Jam Session and it was super fun. I was really grateful for their clear instructions — everything was outlined perfectly and was easy to follow. The activity was self-guided, and was advertised for grades three and up. In the Music Lab, students remix tracks from artists like Sabrina Carpenter, Lady Gaga, and Shakira while mastering coding basics such as sequencing, functions, and exploring AI-driven beat creation. It was a super creative activity that I would love to do with my students!
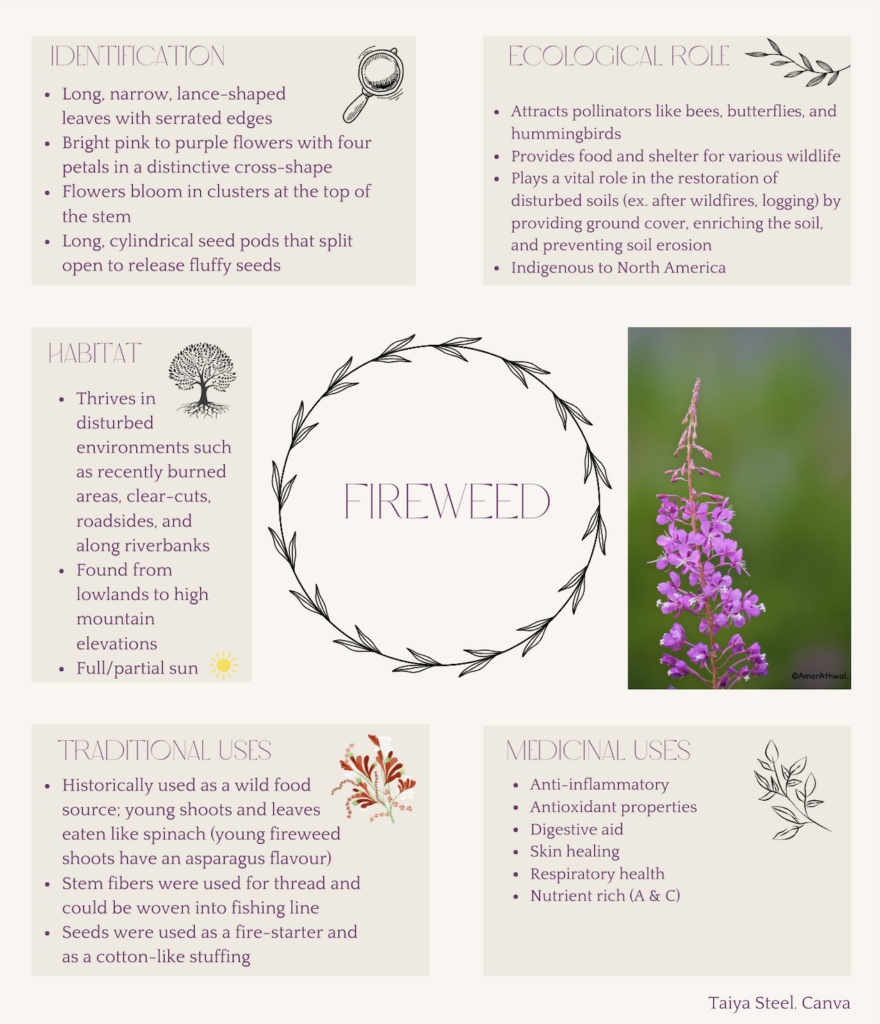
Free Inquiry Topic #8: Learning about Fireweed
I couldn’t find the SENĆOŦEN name for Fireweed, unfortunately! This week, I created an infographic on Canva to share what I’ve learned about the plant. I started with a sketch-note as a rough draft then polished it online 🙂 Fireweed is Indigenous to North America, has a lot of traditional and medicinal uses, and plays a crucial ecological role. Take a look at my infographic!
Fireweed is a super pretty plant. I would see it often during the late spring and early summer while I was in Northern BC tree planting. I actually have a picture of fireweed as a lock-screen on my phone! I’ve included a photo of my close friend Ella planting in 6ft tall fireweed (she has a black eye in the picture haha). It was a happy day for us – definitely a challenge to find the ground. 🙂
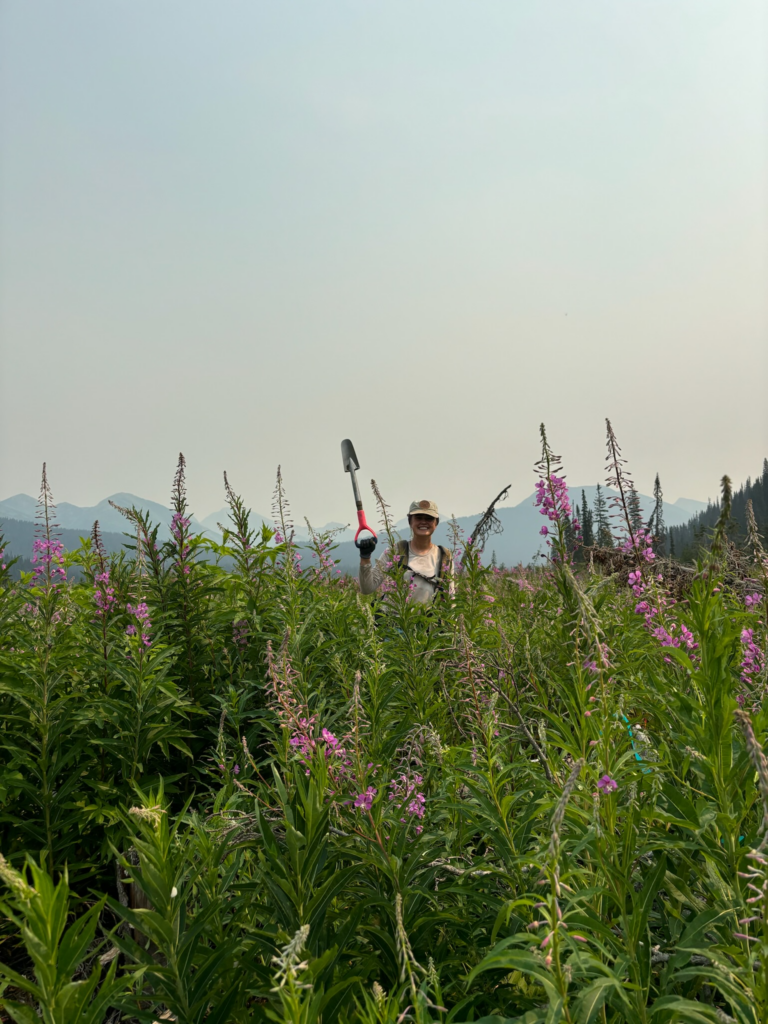
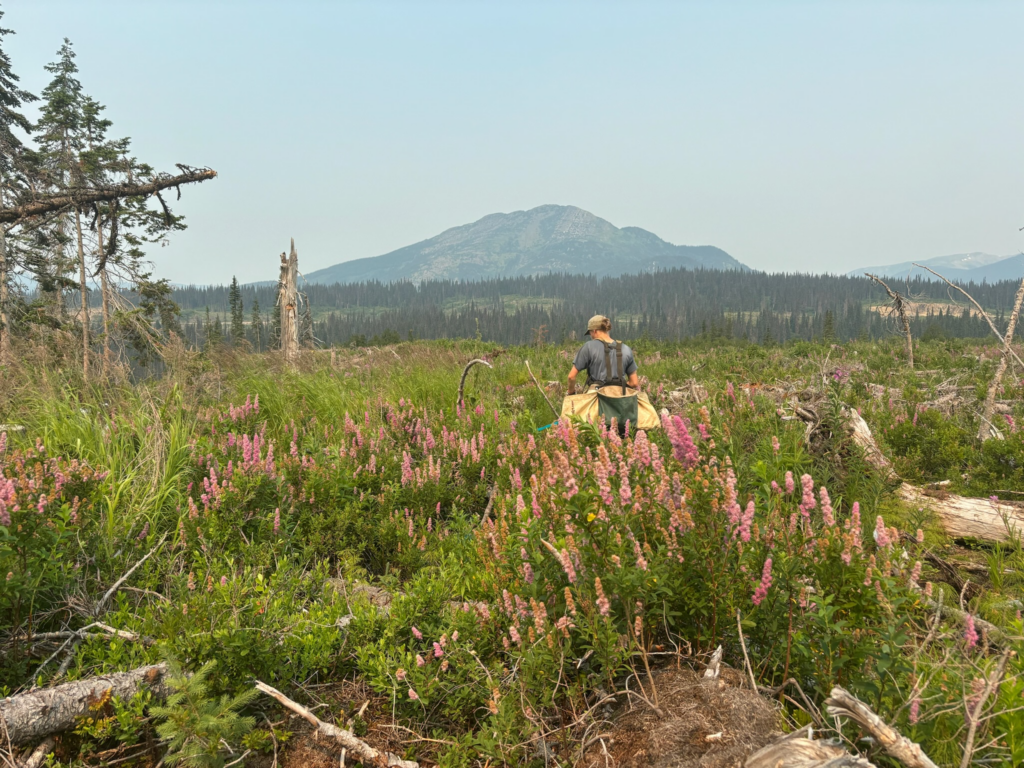
Firewood is truly a beautiful part of land reclamation and I’m so, so grateful to have witnessed its natural processes firsthand.
My sources:
Weekly Reflection #7: Intentionality in Technology Enabled Learning Design
After this week’s class, I’m feeling a bit lost and am finding it hard to understand the differences and similarities between the SAMR & TPACK technology models. So for this reflection blog post, I’ve decided to do a bit more research and try to find out what’s going on! The website HeyHi (https://blog.heyhi.sg/comparison-of-tpack-vs-samr-model-which-one-is-better/) has clarified things quite a bit for me. Their examples of TPACK & SAMR in practice were especially helpful! I’ve included a list of their examples that I pulled out and that I think provide some good ideas.
“TPACK in practice will demonstrate the seamless integration of technological, pedagogical, and content knowledge. Here are some examples of TPACK in practice:
- The use of an interactive whiteboard and online resources to teach a lesson on the geography and culture of different countries.
- The use of an online discussion forum to facilitate class discussions and evaluate student understanding of assigned texts.
- The use of a digital audio workstation and software to teach music composition and production.
- The use of a language learning app and augmented reality to simulate real-world language use scenarios.” (HeyHi)
“SAMR in practice will analyze the extent of technology integration in the classroom. Here are some examples of SAMR in practice:
- The use of a 3D printer to create models of molecules for students to examine, showing the substitution level of technology integration.
- The use of an online game allows students to play individually, in pairs, or small groups, showing the augmentation level of technology integration.
- The use of an online museum exhibit demonstrating the modification level of technology integration.
- The use of a digital writing project that integrates multimedia elements and uses peer review tools, showing the redefinition level of technology integration.
- The use of virtual reality to create immersive learning experiences in social studies class, allowing students to travel back in time and experience historical events, demonstrating the redefinition level of technology integration.” (HeyHi)


Image credits: SAMR model, illustrated by Sylvia Duckworth & TPACK Model by Punya Mishra & Matthew J. Koehler
In addition to these examples, I could use platforms (though I’m not sure which ones yet) to gather student feedback and assess student understanding. TPACK could then help me adjust my tech choices/lesson based on student needs and responses. In addition to HeyHi’s examples of TPACK and SAMR in practice, I also found a lot of value in the Challenges & Advantages [of TPACK & SAMR] Application section of the website.
Advantages of TPACK and SAMR Applications:
- Improved Learning Outcomes
- Increased Student Engagement
- Access to a Wider Range of Resources
- Better collaboration
Challenges of TPACK and SAMR Applications:
- Cost
- Teacher training
- Technology dependence
- Resistance to change
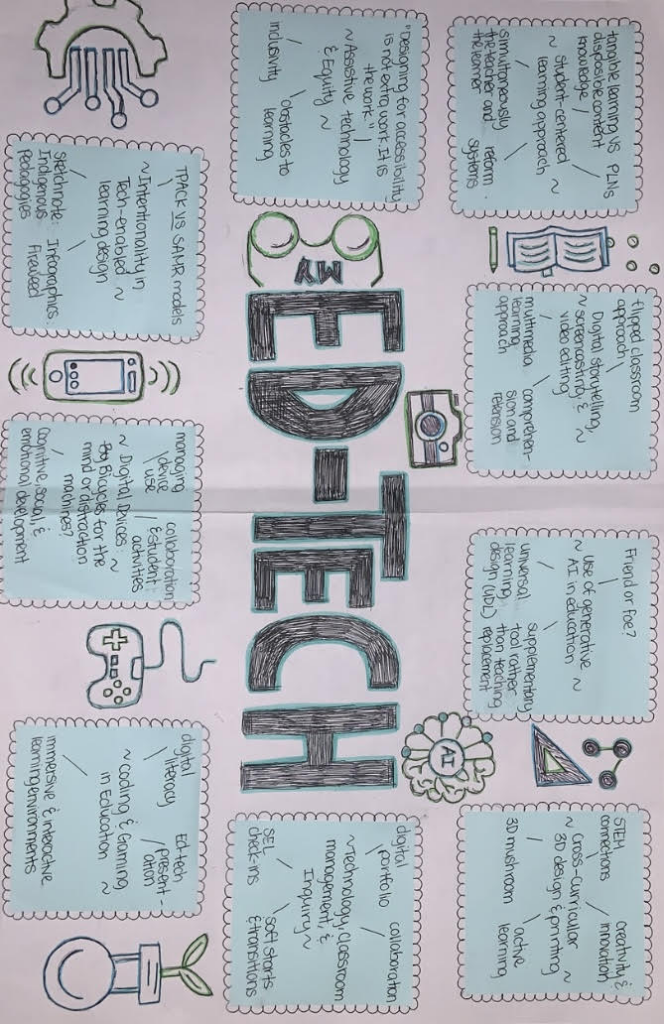
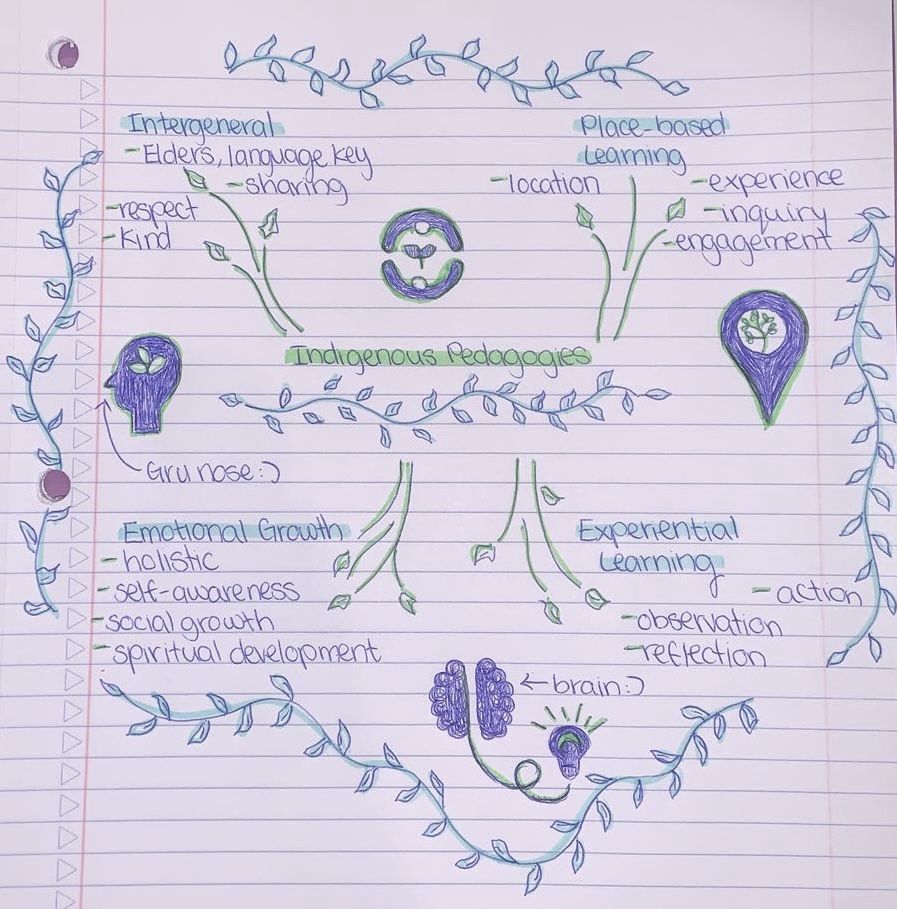
Anyways, I think my extra little research has really helped me this week 🙂 Another topic that we touched on was sketch-noting! I don’t have too much practice with sketch-noting for education purposes… although I like to draw and have been known to doodle while in lecture. It was super interesting and I’m glad that we spent some time exploring it! I’m excited to use sketch-noting with my future students as a note taking/comprehension activity. I think that using shapes, text, and images to virtually summarize and connect ideas is fabulous brain-based learning practice. Sketch-noting can also serve as an effective tool for oral language and reading comprehension. After listening to a Ted Talk or reading a chapter of a book, I could ask students to summarize their understanding through sketch-notes. They could draw key concepts and themes, highlight important terms, and create visual connections. Sketch-noting could also be done collaboratively; students could create a sketch-note on a poster paper or digital platform (which could encourage teamwork and discussion). By incorporating sketch-noting into my lesson plans, I hope to make learning more interactive and help my students develop skills in visual thinking, summarization, and creativity.
I’ve included the sketch-note that I worked on during this week’s class!
Free Inquiry Topic #7: Learning about ḰO,PEȽĆ, Devil’s Club
ḰO,PEȽĆ is a prominent plant in Pacific Northwest coastal rainforests and is extremely valuable to Indigenous peoples of the region. If you have ever come across this plant, you will never forget it! ḰO,PEȽĆ grows upwards of about 1-3 meters tall and has crooked stems covered in brittle, sharp thorns. It has large palmate leaves with many spines on the underside. It’s super prickly, and if you touch the thorns, they will break off and cause little infections. I worked as a tree planter this past summer, and showing up to a block covered in ḰO,PEȽĆ was sure to be a rough day. ḰO,PEȽĆ has small white flowers that mature into bright red shiny berries. Its flowers appear in late spring to mid summer and its berries last into the winter.
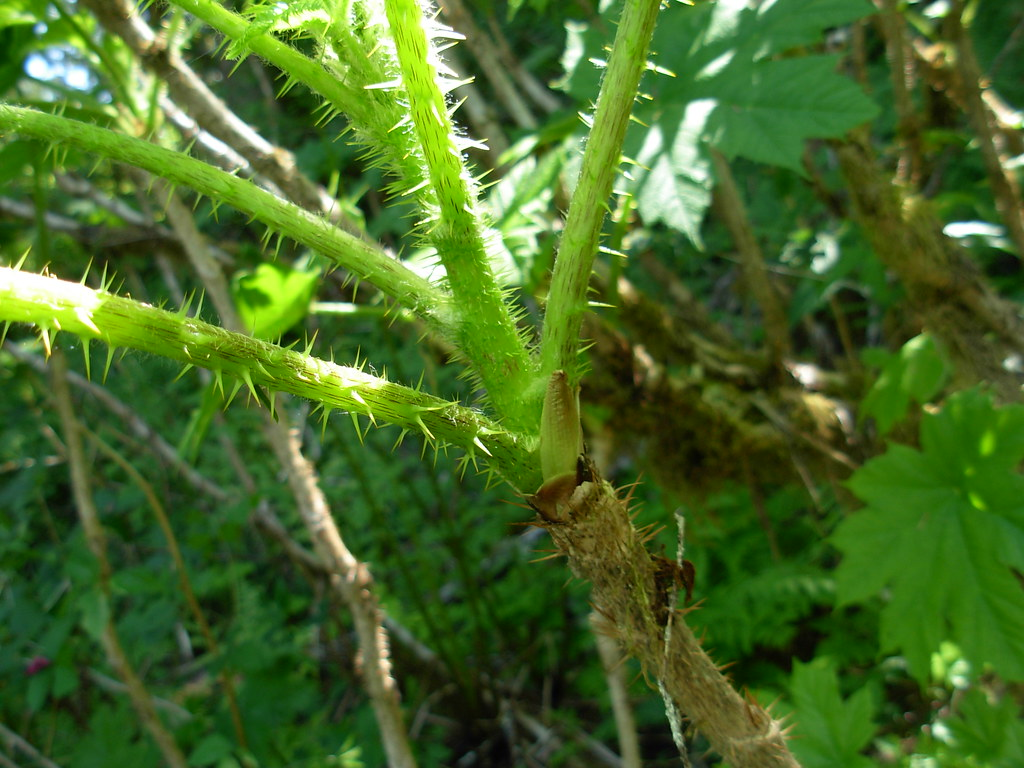
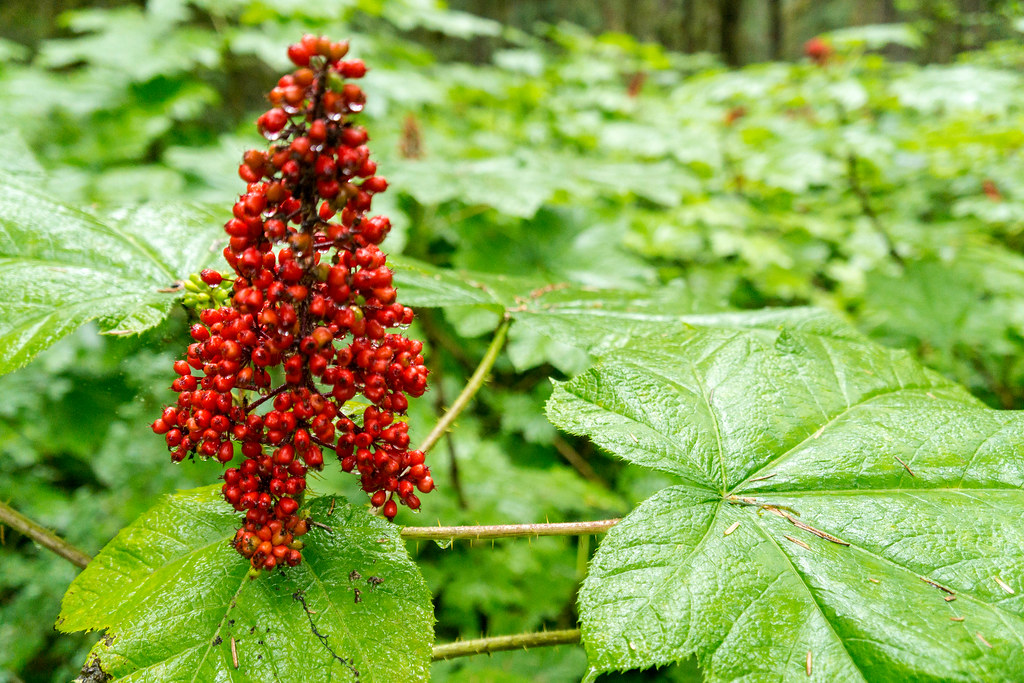
This plant has been used widely amongst Indigenous communities of British Columbia for centuries and is known to be an anti-inflammatory, pain-killing medicine. Various parts of the plant are used medicinally to treat arthritis, bronchitis, rheumatism, ulcers, diabetes and other diseases. The roots and shoots of ḰO,PEȽĆ are edible, but the berries are not (though bears love them!). Charcoal from the stalks is known to have been used to make ceremonial face paints. ḰO,PEȽĆ is considered a deeply important spiritual medicine for many Indigenous peoples; it is used for purification, to ward off curses, for supernatural protection, for strength, and for healing.
I found an amazing article by Kw’umut Lelum — a non-profit Indigenous agency — called “Healing with Devil’s Club”. It was such a valuable source and I want to share some of it with you! In the article, they give tips on how to harvest ḰO,PEȽĆ, and I just LOVE the way they go about it. I’ve pulled some direct quotes from the article:
“Stz’uminus member Dan Elliott shares, “A Devil’s Club salve can be made and directly applied to the skin or consumed as a liquid tincture which can be mixed in with your favorite beverage. The root bark and mulched stalk can also be steeped along with other plants/medicines and brewed into a tea.””
“To Harvest [Devil’s Club]:
As with all medicines, Devil’s Club must be harvested with respect for its gift and care for the interconnectedness of all things. Approach the harvest with good intentions. The best time to harvest is in spring and early summer when the stalk first sprouts green growth and the leaf spines are soft and pliable. Be sure to wear gloves and long sleeves to avoid being cut by the prickly spines and thorns. Offer a prayer, song, or other gift before using garden shears to snip off the smaller spines/branches and allow the main part of the shrub to continue to grow. Return what you will not use back to the forest where it can continue to nurture life, and make sure to never harvest more than you will use.”
“Once you have collected the branches, allow time for the plant to dry – either hanging up on or on a rack. Once dried, the thorns and spikes can be removed with the blunt edge of a knife, and the outer bark be peeled off to be dried for medicine.”
Devil’s Club salve recipe: (shared by Stz’uminus member Dan Elliott)
- Devil’s Club bark, dried
- Olive oil
- Grated beeswax
- Essential oils (optional)
- Vitamin E liquid capsules (optional)
- Jars with lids
- Mesh strainer/cheesecloth
- Large pot or slow cooker
Instructions:
“Fill a jar with shredded devil’s club bark and cover with olive oil (leaving at least ¼ inch of space at the top). Put the lid on the jar, cover in simmering water in a pot or slow cooker and allow to infuse for 6 hours or overnight. Strain the bark from the oil using a fine strainer or cheesecloth.”
“To make the salve, pour the infused oil into a pot and heat on low to medium. Add grated beeswax (2-4 tablespoons per cup of infused oil) and allow them to melt together. At this point, you can add a few drops of your favorite essential oil (optional, but makes it smell nice) and a few drops of liquid vitamin E (also optional, but acts to preserve the salve). Stir together, pour into small jars and allow to cool and harden up.”
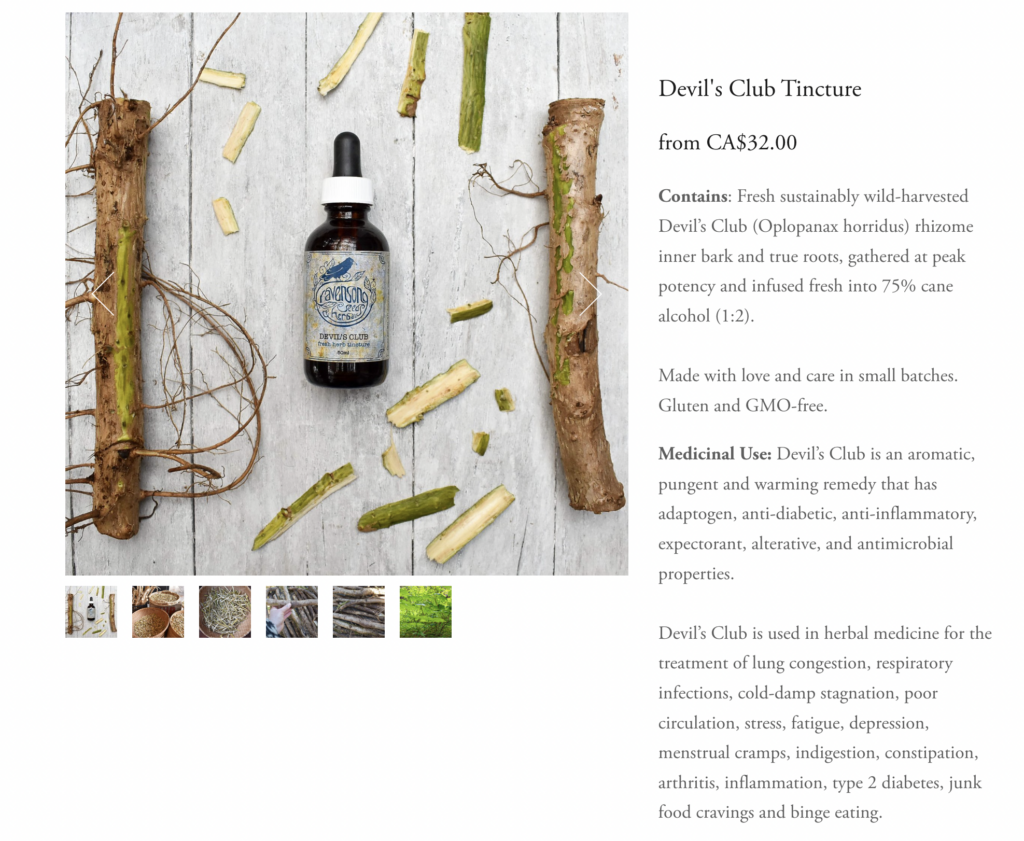
Back to me! I’m going to have to do some ḰO,PEȽĆ hunting in my local area, as I haven’t noticed it on my recent hikes. I am so excited to try out this recipe (and to make peace with the plant 🙂)! I’ve included a screenshot of a Devil’s Club Tincture made and advertised by Ravensong Seeds & Herbals. Now we can make it ourselves — how fun!
Here is a video explaining the logistics of harvesting the prickly plant:
(*) ḰO,PEȽĆ is SENĆOŦEN, a dialect spoken by the Coast Salish peoples.
My Sources:
- https://ravensongherbals.com/single-herb-tinctures
- https://www.kwumut.org/news/x42r35bc8a4tobeauwflfnpouyndgf
- https://sierraclub.bc.ca/devils-club/
- https://ethnobiology.org/sites/default/files/pdfs/JoE/2-1/Turner1982.pdf
- https://camosun.ca/about/sustainability/operations/land-and-habitat/natsamaht-indigenous-plant-garden/native-plants
- https://ravensongherbals.com/blog-post/devils-club-medicine#:~:text=Traditionally%20Devil’s%20Club%20was%20prepared,uses%20of%20the%20herb%20today.
- https://www.hearthsidehealing.com/articles/devils-club-sacred-plant-of-the-northwest#:~:text=Devil’s%20Club%20is%20also%20considered,for%20dancing%20between%20the%20worlds.
- https://www.youtube.com/watch?v=aa75Qb-akQ0
- https://www.kwumut.org/news/x42r35bc8a4tobeauwflfnpouyndgf
- https://www.youtube.com/watch?v=7EVAb5I8HbA
- https://www.kwumut.org/news/x42r35bc8a4tobeauwflfnpouyndgf#:~:text=Stz’uminus%20member%20Dan%20Elliott,and%20brewed%20into%20a%20tea.
- https://ravensongherbals.com/blog-post/devils-club-medicine#:~:text=Traditionally%20Devil’s%20Club%20was%20prepared,uses%20of%20the%20herb%20today.